How to Navigate off Ben Nevis in Winter
For very good reason does Ben Nevis translate as The Venomous One, as anyone knows that has wandered around the summit plateau on a wild winter night, desperately seeking escape from this hellish mountain. Navigation off the summit plateau of Ben Nevis in winter must be regarded as the most serious descent from any mountain in Britain. It is best to be wise before rather than after the event - as I know only too well!
For the walker
Getting up is only half the battle, and it's often on the descent that teams come unstuck. In poor visibility pay extremely close attention to navigation, and do not rely solely on your phone or GPS.
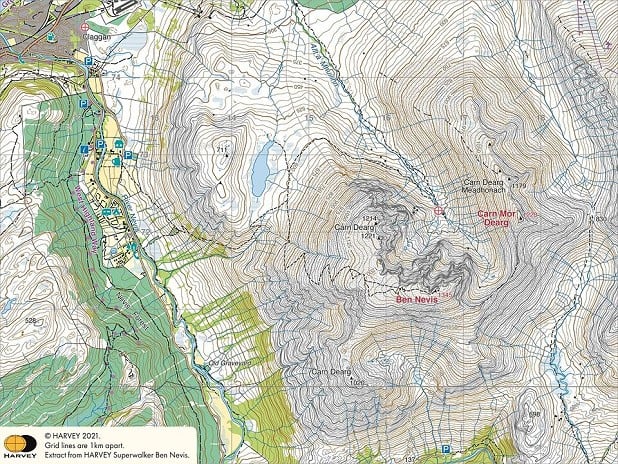
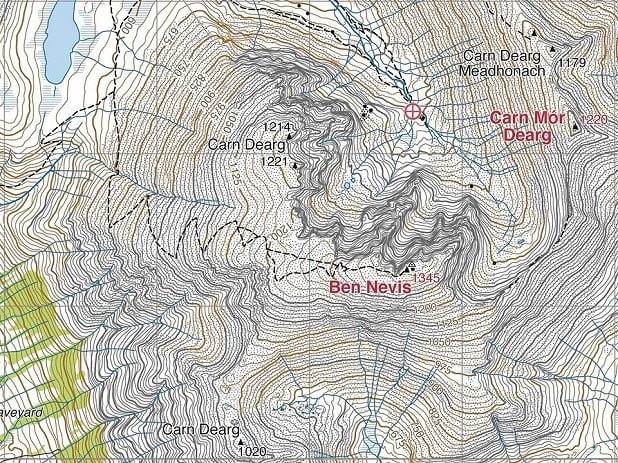
The Harvey Superwalker map shows the difficulty well. The summit plateau of Ben Nevis is surrounded by steep, treacherous ground on most sides, with only a relatively narrow strip of walkable terrain - as followed by the Mountain Path, the standard route up and down.
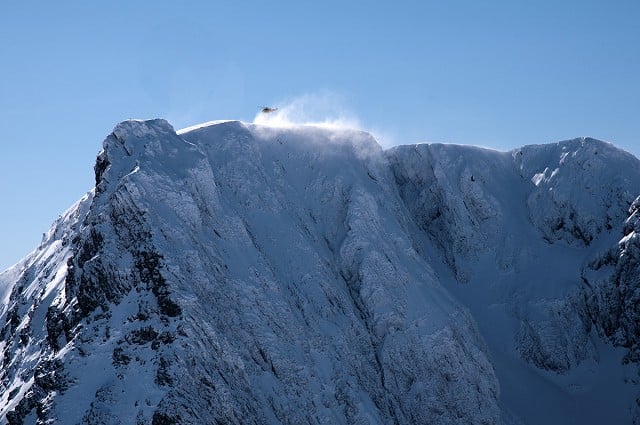
Stray either left or right off your bearing and you can quickly end up somewhere it's much better not to be. Cliff edges may be corniced, the ground could be icy and unforgiving, and visibility can be appalling. Add darkness, wind, cold, or fatigue, and the potential for mishap is obvious.
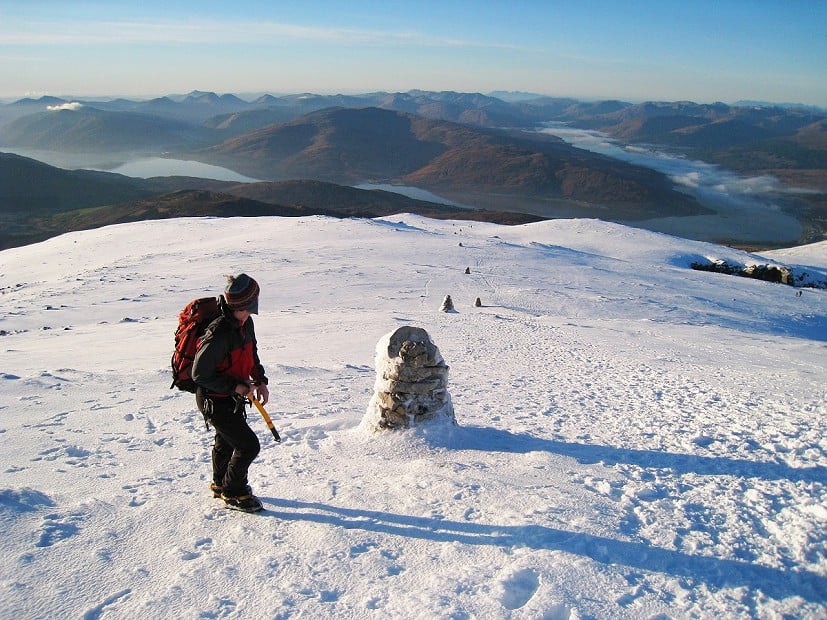
From the summit cairn, follow a Grid bearing of 231 degrees for 150 metres. Beware of the steep drop into Gardyloo Gully on your right. Remember that mapping apps may take you over the edge as they navigate a direct line of return!
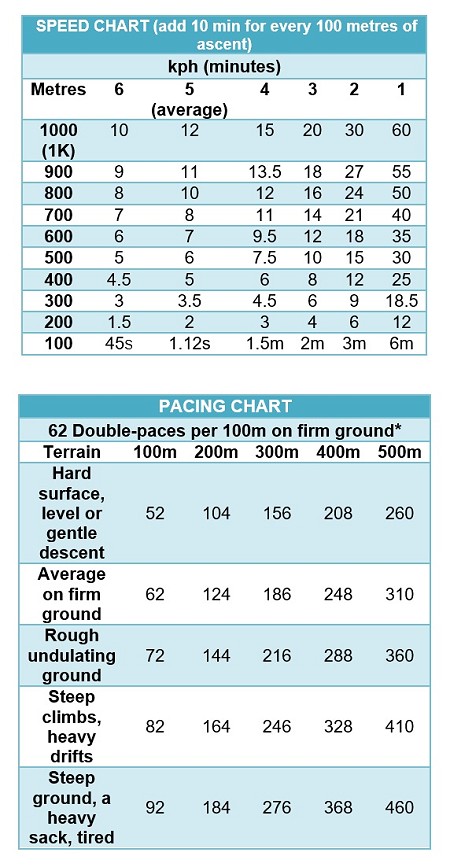
You will also need to confidently pace the distance, between 90 & 120 double paces for the first leg, depending on the individual and conditions. Practice pacing on lower and less serious terrain before using it on Ben Nevis. If you have a rope of known length, you can use this to measure the distance, as well as a sighting aid in really thick whiteout conditions.
Once you have done this leg and passed the top of Gardyloo Gully, turn onto the second Grid bearing of 282 degrees. This leads to the zigzags of the Pony Track (Mountain Track on map). This crosses the Red Burn.
It is often this section that goes awry: After travelling 300 metres on fairly flat terrain there is a steeper section for about 100 metres (McLean's Steep) before the angle eases again (check contours on the map). There is a natural tendency to steer very slightly to the left of the bearing in order to keep away from the north face. This is entirely understandable and may even be a wise precaution under certain conditions. However this slight deviation can have disastrous consequences and place the unfortunate walker dangerously close to the steep and potentially fatal ground at the top of Five Finger Gully. Being forewarned is to be forearmed and the knowledge that Five Finger Gully lurks below you to the south-west is an important piece of information to keep in mind. If there is a strong side-wind then this also can affect accurate navigation with a tendency to drift to the one side or the other.
The edge of Five Finger Gully is about 800 metres from the top of Gardyloo Gully from where the 282 degree Grid bearing began. Careful attention to pacing and timing will keep you informed about how far you have travelled. If, after about 800 metres from the top of Gardyloo Gully, you reach steep ground dropping away to the west, southwest or south then you have strayed into the top of Five Finger Gully. If you find yourself travelling south downhill with a cliff edge on your right (west) you will have veered off the bearing significantly.
Magnetic variation
Confusingly, there are three 'norths': the magnetic north that your compass needle points to; 'true' north - ie. the geographical north pole; and grid north, to which the lines on your map are aligned. The angle between magnetic north and the others varies according to location, and also changes as the Earth's magnetic field varies over time. You may have to make allowances for the difference between grid north and the north on your compass.
The British Geological Survey website includes a tool to calculate the 'Grid Magnetic Angle' between grid north (British National Grid) and magnetic north at a given location - see here.
As of July 2021 magnetic north is estimated to be 0 deg 14 min EAST of grid north (British National Grid) on Ben Nevis. That's currently negligible, and can be ignored - however the GMA is slowly increasing as magnetic north migrates eastwards, so in future years the value will become significant enough to take into account when using your compass on Ben Nevis.
For the winter climber
For climbers on the Nevis cliffs the above information may not be relevant. The North Face of Ben Nevis is over three kilometres across and the point of arrival on the summit plateau is dependent on where a selected climb terminates. This will be vastly different on the Brenva Face routes than for climbs that terminate on Carn Dearg, and anywhere else in between.
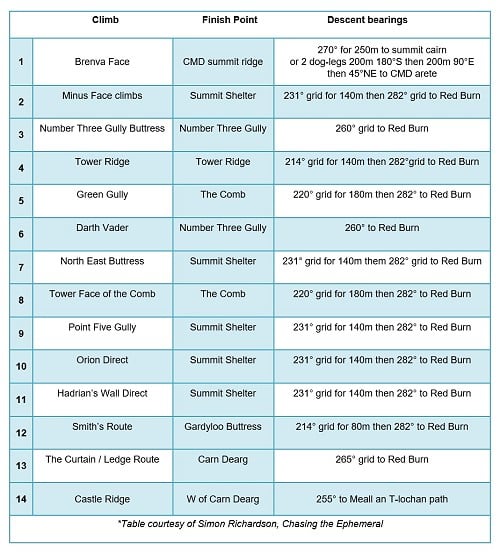
For example Tower Ridge is one of the most popular winter climbs in the country, yet it finishes some distance away from the summit cairn. In difficult conditions it is often not necessary or desirable to visit the summit, and so a different and safer route can be calibrated to reach the Pony Track descent. Simon Richardson's brilliant book Chasing the Ephemeral includes a handy table of descent bearings, which he's kindly allowed us to base the following list on:
If the chosen route is decided beforehand, the required bearings can be pre-plotted and either marked on a map or the coordinates logged on a mobile or GPS device. But not everything goes to plan and objectives change. Besides, the chosen descent route off the plateau will obviously vary with different climbs. On Carn Dearg it is relatively straightforward to head across the shoulder of the plateau directly to the Pony Track or the Halfway Lochan, whereas for a climb on the Brenva Face it might make more sense to traverse the CMD arete.
Conditions permitting, experienced climbers will be tempted by the quick easy descent down No. 4 Gully (marked by a large cairn, which may also be used for the initial abseil if the cairn isn;t buried and the gully is corniced). Gaining the CIC path that leads to the North Face Car Park is far more pleasant than crossing the bogs and heather from the Halfway Lochan.
Maps
The Harvey's Ben Nevis Superwalker map at 1:25.000 scale clearly shows the bearings and distances. It's worth noting that Harvey also publish a specific Ben Nevis summit map at a very close-up 1:12,500 scale.
Key points
- Remember that the Ben Nevis climbs are spread out across a complex 3km wide mountain face. In bad weather conditions in winter, it is perhaps best to navigate from where you actually arrive on the plateau, rather than following advice tailored to descent from the summit.
- Use three dog legs if in doubt, to navigate off the summit to avoid both Gardyloo & Five Finger Gully.
- It may be easier to escape the summit plateau in bad weather down No 4 Gully. But this grade I downclimb is for the experienced climber only as the marker cairn can be obscured by snow, the initial descent may require an abseil, and the slope below may be prone to avalanche in bad conditions. Nos. 2 & 3 gullies are also a possibility for climbers. It's useful to know that No. 3 Gully has an obvious pinnacle to make identification easier.
- Be aware that the Red Burn has been known to avalanche and avoid if at all suspect.
- Don't be tempted to descend via the CMD Arete in very bad winter conditions as the upper slopes of The Ben curve around the Brenva Face and its large cornice, the scene of a number of fatalities. The abseil posts down into Coire Leis (lots of difficult ground to cover with many hidden cliffs lurking to entrap the unwary climber) are long gone. Staying roped up is another sensible idea hereabouts, as is traversing the Arete across to Carn Mor Dearg before dropping into Coire Leis.
- Don't forget the torch and a spare, both fully charged!
- Do keep the rope on in really bad winter conditions (white-out), as it could arrest a potential fall over a hidden cornice, and this also allows the compass to be sighted on the lead climber, to ensure the correct bearing is actually followed.
- Use a waterproof map, preferably kept in a map-case. A large scale map of the summit area is a godsend (there is a 1:12,500 map available). Be aware that laminated maps and winter gloves have little friction, so a map can be easily blown out of the hand. Two maps are better than one!
- Remember that a phone or GPS device are fine as long as the batteries are fine too, but extreme cold is not conducive to extended battery life.
- Understand that attempting to navigate in truly wild weather can be almost impossible.
- Download an Altimeter and a Grid Reference locator onto your mobile, to be used in conjunction with a map.
- Always carry a survival shelter in your sack in winter, even if it is only used to grab and quick warm drink and energy-rich food intake. It is also invaluable in extreme conditions, when trying to work out escape bearings off the plateau.
- Consult the SAIS website to check on snow conditions and any possible avalanche risk and plan you route up and down accordingly.
- Do be aware of accident blackspots such as descending to the CMD arete, Gardyloo Gully, Coire Eoghainn, Sloc nan Uan, No. 5 Gully, the Red Burn, and 5 Finger Gully. The slope west of Carn Dearg can be a sheet of ice, as it receives the afternoon sun and refreezes later.
- Don't underestimate this mountain or it might come back to bite you!
Navigation aids
These charts are designed as handy aids to navigation but knowledge of how to use a map and compass is paramount in the mountain environment. These charts can be copied, laminated and kept in a map case for quick reference.


