Restricted Access
The tree above the Middlefell Buttress descent has now fallen: early November 21. It is lodged in the gully below. The remaining timber has been cleared. The blocks behind the tree are used as an abseil point into the gully. They may be weakened by the demise of the tree. Caution advised in using the blocks. It is possible to scamble down this descent, but it is loose and serious.
A significant rockfall from the split block on the normal descent has meant that a large block and oak tree which formed part of the descent route through its trickiest section are now gone. The descent (which was already awkward and had resulted in several bad accidents over the years) is now significantly more difficult and exposed. A great deal of care will be needed if attempting this descent now and alternative descents are probably better either by abseil or walking to the top of the crag, heading right and coming down around the side of East Raven Crag. 2018
2019 Update: Due to rockfall the traditional Split Blocks descent route can no longer be recommended. An abseil descent has been established. Details are as follows, guidebook references are to the definitive Langdale (2013) and Lake District Rock (2015).
The Langdale guide has photodiagrams on pages 153 and 160 that show the traditional Split Blocks descent. In Lake District Rock this descent is shown on the photodiagrams on pages 69 and 70. On the Revelation Area view in the definitive guide (page 160), a skull and crossbones symbol will be seen above the finish of Kneewrecker Chimney (route 24). In Lake District Rock (page 70) the symbol is an exclamation mark and Kneewrecker Chimney is route 11. These symbols mark the start of the even more unsafe scrambling descent warned about in these guides and it is now exactly where the abseil station is located. Likewise on the main frontal view of the crag, these symbols will be seen above the line marking the traditional descent route. To find the abseil station the general instruction is; From the top of the main buttress head up and generally rightwards for a few metres (vague path) and the abseil strop/station will be seen around a huge flake-block. A 30m abseil takes you to easy ground. However, this abseil can be done on a single 50m rope to reach ledges at 25m but care is required not to go past these and run off the end of the rope – tie knots in the ends of your rope!
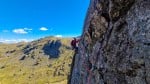
Rockfax Description
Interesting and varied climbing up the wall just right of the vegetated gully, with a memorable top pitch. Start at the base of an easy rake that leads up right to a large pinnacle.
1) 14m. Climb the wall to meet a shallow corner and climb this to a stance just above.
2) 13m. Move up the wall to a small ledge. Traverse left before making a couple of awkward moves up a short steep crack/groove to a large ledge - belay on the left.
3) 4a, 20m. Move back right and make steep pulls over an overlap to easier-angled ground. Take the blunt rib to the top. © Rockfax
Ticklists
Preston Mountaineering Club First Ascents , Lakeland's Best Multi-pitch Routes up to HVS , Lake District Multipitch Climbing
Feedback
| User | Date | Notes | ||
|---|---|---|---|---|
| C Witter | 5 Dec, 2022 |
Show βeta
βeta: Can be done in a oner with 60s by the confident. At the big ledge, making an exposed step back right is the most fun way, despite being a touch artificial. Newish ab point just to right (looking out) of top, which is probably 40m down gully to the start of the route. Take care walking to it. | βeta? | |
|
Show beta
βeta: Can be done in a oner with 60s by the confident. At the big ledge, making an exposed step back right is the most fun way, despite being a touch artificial. Newish ab point just to right (looking out) of top, which is probably 40m down gully to the start of the route. Take care walking to it. |
||||
| Rosa M W | 22 Aug, 2020 |
Show βeta
βeta: Size 0.5 green cam protects the crux perfectly. Some big spiders on the second pitch. | ||
|
Show beta
βeta: Size 0.5 green cam protects the crux perfectly. Some big spiders on the second pitch. |
||||
| FrankieMac | 21 Sep, 2019 |
Show βeta
βeta: Gear is good on 1st pitch, but is pretty sparse on 2nd | βeta? | |
|
Show beta
βeta: Gear is good on 1st pitch, but is pretty sparse on 2nd |
||||
| Si Withington | 19 Jun, 2019 |
Show βeta
βeta: Teaching trad lead climbing | βeta? | |
|
Show beta
βeta: Teaching trad lead climbing |
||||
| TGHB | 28 Apr, 2019 |
Show βeta
βeta: Easy to run 1 and 2 together if you're thoughtful about ropework | βeta? | |
|
Show beta
βeta: Easy to run 1 and 2 together if you're thoughtful about ropework |
||||
Logged Ascents
Guidebooks for Raven Crag (Langdale)
Not all climbs at crag may appear in this book 76 users have this on their wishlist
Please Login to view more details on the logged ascents
Corvus, The Direct Start
Grade: S 4a ***
(Raven Crag, Combe Ghyll)