How to resize Photos in your Graphics Package
Update May 2008: You can now upload full size images straight out of your camera, and we will automatically resize them for you. If you prefer you can still resize the photos yourself, for maximum control over how the photos will appear on the site.
Return to Photography: Preparing photos for the Internet article
IrfanView version 3.xx on a PC - First load your photo into IrfanView and do any adjustments you want, such as cropping and adjusting the colours. In the menu bar click Image and drag down to Resize/Resample. On the new window select Set new size and type in a width of 1000 pixels for a landscape photo, or a height of 800 pixels for a portrait photo. Make sure that 'Preserve aspect ratio' is ticked, and Size method is set to 'Resample (better quality)'.
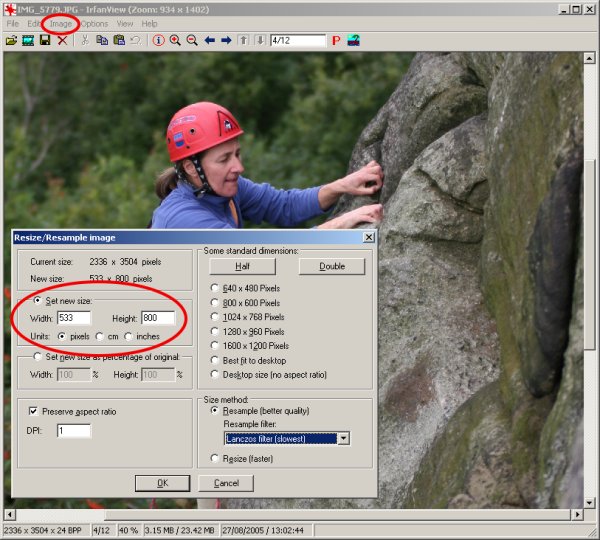
Save the photo with a new filename by clicking File in the menu bar, then Save as... and save it as 'JPG - JPEG Files'. Use the JPEG Save quality slider to pick the best quality you can and keep the size of the file under 1023Kb. A quality of 80 works for most photos.
Photoshop Elements version 3.xx on a PC - First load your photo into Photoshop and do any adjustments you want, such as cropping and adjusting the colours. In the menu bar click Image and drag down to Resize > Image Size.... On the new window look at Pixel Dimensions and type in a width of 1000 pixels for a landscape photo, or a height of 800 pixels for a portrait photo. Make sure that 'Constrain Proportions' is ticked, and Resample Image method is set to 'Bicubic'.
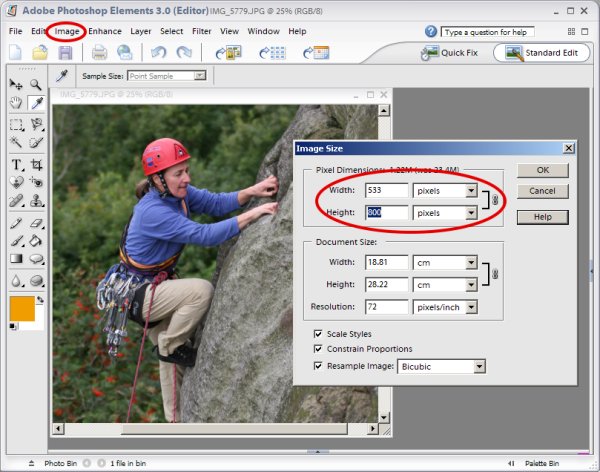
Save the photo with a new filename by clicking File in the menu bar, then Save for Web.... In the new window select 'JPEG High' from the Preset menu, and reduce the Quality slider until the filesize is under 1023Kb. The filesize is shown at the bottom of the screen, just above the estimated download time. A quality of 50-60 works for most photos. Even faster, you can click on the arrow right of Preset which opens the Optimize to File Size window - just enter 1023Kb and you're done.
GIMP version 2.xx on a PC/Linux/Mac - First load your photo into the GIMP and do any adjustments you want, such as cropping and adjusting the colours. In the menu bar click Image and drag down to Scale Image. In the Pixel Dimensions area of the Scale Image dialogue box which appears either; set New Width to 1000 pixels for a landscape photo, or New Height to 800 pixels for a portrait photo. Make sure that the Ratio x and y values are both 1 and that the chain icon between them is linked. Use Cubic interpolation for the best image quality after resizing.
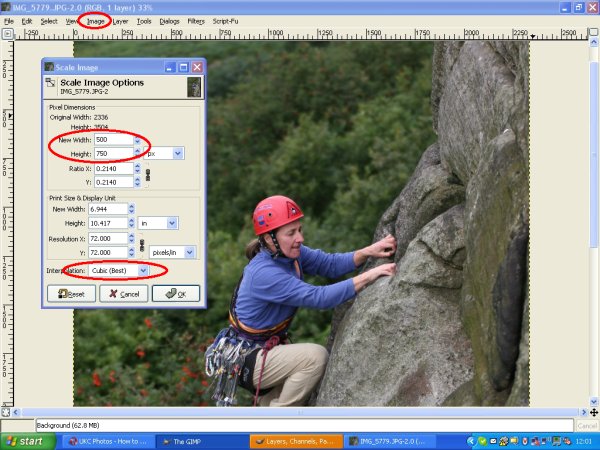
Save the photo with a new filename by clicking File in the menu bar, then Save as... and save it as 'JPG - JPEG Files'. Use the JPEG Save quality slider to pick the best quality you can and keep the size of the file under 1023Kb. A quality of 80 works for most photos and keep the "Optimize" box ticked.
Many thanks to Ian Hill, Dominic Mason, Paul Evans, Duncan Irving and Bob Wightman for their help in producing this page.