Restricted Access
July 2018 - Major rockfall affects Lost World/Mordor areas. In recent years there have been significant and massive rockfalls (hundreds if not thousands of tons of rock) in this area, and in early July another significant rockfall occured here, that would have wiped out anyone in this area at the time. There is further significant and unpredictable rockfall likley here and it would be prudent to avoid this area.
The Upper Dinorwig quarries are mainly owned by First Hydro. Access for climbing or any access away from the designated footpaths is not permitted by the landowners, due to liability concerns. However it's rare for climbers to be asked to leave and in general it appears that if climbers keep a low profile, avoid damaging fences, do not interfere with any of the power station buildings or apparatus or any of the historic structures within the quarry that climbing is possible. Access to the whole of the upper quarries have become especially sensitive in recent years and climbers should not gather in large numbers, especially at Dali's Hole area. Bolts have been removed from Dali's Hole by a local climber (late 2010) who was concerned that continued use of this venue by large groups of climbers would jeopardise access to the whole site. There have also been a number of reported altercations between climbers and First Hydro security staff over the years at this venue.
BMC advice remains unchanged - the landowners do not give permission for public access (including for climbing) away from the public paths. Please do not damage fences or signs and if accosted by security staff, please be courteous and report any issues to the BMC.
Seasonal Restrictions
Reason: Nesting Birds
A fence has been errected across the base of the Dali's Hole area to deter access to this area due to liability concerns by First Hydro. Access to this area is especially sensitive at this time and security staff have been reported to be asking climbers to leave this area.
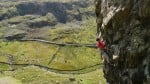
Rockfax Description
Scramble up the chain to rack up on The Razor's Edge terrace.
1) 5b, 20m. Climb the pillar left of the V-groove. Cross the next rib on the left and quest up to the crack for some more reassuring gear. Rise until level with the The Desolation of Smaug! belay and traverse over to it.
2) 6a, 40m. Clip the first bolt of The Desolation of Smaug! then enter the groove. Follow this until pushed onto the rib and then follow this until the first of Joe Brown's bolts is spotted over by the corner on the right. Gain this and go up to the bolt at Joe's high point (the bolt is difficult to clip as it is bunged up with old tat). Continue in the corner until a slightly unnerving slopey traverse gains the big slopey ledge. Shuffle left on this to the The Desolation of Smaug! belay.
3) 6a, 50m. Climb the corner system directly above the belay to a decaying pink sling on a flake. Make a rising traverse left (cam slot), then go back right past a possible belay to climb directly up the corner system above. There is another possible belay here - either way plug the gear in the easy bits because it is about to run out. The corner starts to fill out into the right arete. Surmount the arete to join pitch 5 of The Desolation of Smaug! just before the crux. Follow this to the belay.
4) 6b, 20m. Finish as for The Desolation of Smaug! © Rockfax
UKC Logbook Description
P1 5b 30m Climb the pillar left of the v-groove, cross the next rib on the left and quest up to the crack for some more reassuring gear. Rise until level with the TDOS belay and traverse over to it.
P2 6a 40m Clip the first bolt of TDOS then enter the groove; follow this until pushed onto the rib and then follow this until the first of Joe Brown’s bolts is spotted over by the corner on the right. Gain this and go up to the bolt at his high point (the bolt is difficult to clip as it is bunged up with old tat). Continue in the corner until a slightly unnerving slopey traverse gains the big slopey ledge, shuffle left on this to the TDOS belay.
P3 6a 50m Climb the corner system directly above the belay, to a decaying pink sling on a flake (remnant of a Ray Kay jaunt). A rising traverse left meets the junction with the Taith Mawr Traverse (cam slot) follow this back right to where Taith Mawr belays but quest directly up the corner system above the belay (plug the gear in the easy bits because its about to run out). The corner starts to shut out into the right arête; surmount the arête to join P5 of TDOS just before the crux, follow this to the belay.
P4 5b/F6b 20m Finish as for TDOS.
Callum Muskett, Mark Dicken Sep/2014.
Feedback
There is no feedback for this climb.
Logged Ascents
There are no ascents logged for this climb.
Guidebooks for Twll Mawr
Not all climbs appear in all guidebooks


Tufty Club Rebellion
Grade: E5 6b ***
(Esgair Maen Gwyn (Scimitar Ridge))