
Navigation is simple! OK, it's easier said than done but, once demonstrated, the skills such as pace counting and taking bearings are, if practiced regularly, quite straightforward. But the key is lots of practice and 'being bothered'. When people get lost, it's often not because they can't take a bearing or read a map. More likely, they didn't think it was necessary to take a bearing and then the cloud came down. Humans are naturally quite lazy beasts so if we think it's not necessary to do something, then we won't. Such an economical attitude with navigation normally ends up with mistakes that take longer to rectify than making the extra effort in the first place.

What is a Map?
For a map to work, it requires three key elements. You need to be able to define DIRECTION, you need to be able to measure DISTANCE and you need SYMBOLS to represent the landscape around you.
DIRECTION
To give direction, you need a fixed reference point and on maps that is always north. All walking maps have a grid, which is made up of vertical grid lines that run north-south and horizontal grid lines that run east-west. North is at the top of the map and most text (apart from that aligned with streams, rivers and valleys) is aligned to be read with north at the top.
Orientating the map using ground features
When walking along a track we want the features that appear on the ground to our left to be to the left of the track on the map. To do this it is necessary to turn or orientate the map till the features on the map match up to the features on the ground. Once the map is set correctly, think of yourself moving around the map as you go for your walk and that the orientation of the map remains fixed.
Orientating the map with a compass
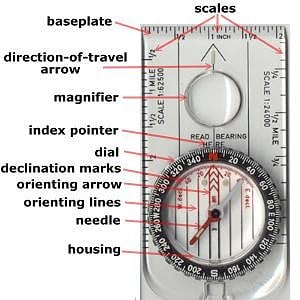
When there are insufficient features to help set the map or if visibility is poor, you can orientate the map with the aid of a compass. Hold the map flat in front of you and place the compass on the map with the orienting lines on the base of the compass lining up with the north-south grid lines and the arrow on the orienting lines pointing to north on the map. Then, without touching the compass, turn yourself and the map till the red compass needle sits in the arrow and is parallel to both the orienting lines and the grid lines. The map is now correctly orientated.
The importance of map orientation cannot be over-emphasised. Whichever method you use, it should be the first thing you do every time you look at the map.


DISTANCE
To measure a distance off a map you need to know the scale of the map. The three most commonly used scales in the UK for walkers are 1:50,000, 1:25,000 and 1:40,000. OS use 1:25000 and 1:50,000. Harvey use 1:25,000 and 1:40,000 and the BMC maps produced by Harvey use 1:40,000.
A scale of 1:50,000 simply means that 1 unit on the map represents 50,000 units on the ground. Most people find it easier to think of how many cm to the km. And as the navigation becomes more complex it is useful to think how many mm on the map represents 100m on the ground.
1:50,000 = 2cm to the km, 2mm = 100m
1:25,000 = 4cm to the km, 4mm = 100m
1:40,000 = 2.5cm to the km, 2.5mm = 100m
The edge of most compasses should have a ruler graduated in mm. This enables you to measure distance off the map and convert it to distance on the ground. If you do not already own a compass, buy one with romer scales for the most common map scales. A romer scale is simply a ruler graduated according to the scale being used. So using the 1:50,000 romer on a 1:50,000 map enables you to measure the distance on the ground straight from the map, without any need for mental arithmetic.

On maps in the UK grid squares are all 1km by 1km. So on a 1:50,000 map, if you measure the length of a grid square with the ruler on your compass it will be 2 cm. Remember Pythagoras's theorem from your school days? It tells us that the diagonal of that 1km square is approx 1.5km. With practice, counting squares and diagonals can quickly give you an approximate way to measure a route without the need for a dedicated map measurer or laying pieces of string along the route.
Gauging distance travelled
Now you can measure distances accurately using the romer, you need a way of judging how far you have walked over the ground. The two most common methods are timing and pacing. For the purpose of this article, we'll restrict ourselves to timing. For most hill walking you'll find yourself travelling at 3, 4 or 5 km/h depending on the terrain. When walking at 4km/h you will cover 1km in 15 min and hence 100m in 1.5min. Having a laminated timing chart attached to your compass allows you to convert distance to time more easily. Only practice will tell you what speed you are walking at but if you time a leg and get there too soon don't berate yourself for getting it wrong. Instead learn from it and realise that over that terrain on that day you were walking faster than expected. You can then make a suitable adjustment for the next leg. With that attitude the more times you try it the more accurate you will get.
Adding time for height gained
Over legs with appreciable height gain you will need to add some extra time. This is partly because you walk slower uphill but also because the slope distance that you walk uphill is further than the horizontal distance that you measure off the map. As a rule of thumb, add 1 minute of time for every 10m contour that you cross. In practice, unless it is very steep many people will find this rule rather generous so experiment with 0.5 minutes per 10m contour where it is less steep.
SYMBOLS

Before you next go out walking, find some time to open out your map fully and look at all the information in the legend and around the border of the map. As well as a full legend to the symbols used on the map, there is plenty of other information such as a scale bar and information about magnetic variation and latest revision date. Try and get to know all the main symbols as some can be mis-interpreted or confused with others.
Paths and rights of way on 1:25,000 maps
Rights of way are shown as green dashed lines - it is important to realise that a right of way is the representation of a legal right to walk/ride but does not mean that there is any physical evidence of a path on the ground. The symbol for a physical path on the ground is a line of tiny black dashes. Where a right of way corresponds with a path visible on the ground, these two symbols will appear side by side. Look closely at the map and use the magnifier on your compass, if necessary, because the black dashes are very small and sometimes get obscured by the larger green dashes or by other map information. Many walkers have confused themselves by thinking that the presence of a very visible green dashed line along a route will mean that there is an easy to follow path on the ground. This simply is not the case. Conversely the presence of a major path on the ground denoted on a map by the tiny black dashes is no evidence of your right to be there unless the land is Access land, defined by the CROW act.
Contours
A contour is a line of equal height. The height difference between successive contours is called the contour interval. OS maps have a 10m interval and on Harvey maps the interval is 15m. Every 5th contour is thicker to make it stand out on the map. These are called index contours. They are useful to help measure height difference between two points. Instead of counting every contour, count just the index contours then multiply by five to find the total number of contours. Multiply that number by the contour interval to find the actual height difference.
Understanding contours and being able to see a clear 3D image of the ground represented by the 2D pattern of the contours is perhaps the hardest part of navigation for many people. We will look at this is more detail in a later article. At its simplest: where the contours are closer together, the ground is steeper. Where they are further apart, the slope is less steep. Hills appear as concentric rings of contours.
The BMC maps can be helpful in visualising land shapes as they use contour layer shading. This uses subtle changes in colour as height increases and therefore makes it much easier to see where the high ground is and where the valley bottoms are.
Different types of slope

Administrative boundaries
OS maps are not solely produced for walkers but also to show land ownership and are used for legal purposes. As such they still show a number of administrative boundaries such as county and parish boundaries. These are not visible on the ground but the symbols could easily be confused for paths or fences. So before you next head off into the mist, just check that the feature you are following on the map is what you think it is! Harvey maps have an advantage here as they are made by walkers for walkers and do not show administrative boundaries that can confuse walkers.
Land Cover Screens
Both OS and Harvey used printed screens to show certain types of terrain such as scree, boulder fields and also vegetation type such a tussocky grass. Don't confuse screens for individually mapped features. I have seen people trying to navigate towards what they believed to be a sheepfold, when it was actually part of the screen print for an area of boulders. Again, read the map legend carefully.
Putting it in to practice
Now some homework. You need to get a map and find an area that you know quite well and that has a good network of linear features to follow. Paths, tracks, streams, forest boundaries. The area should be in open access land (clearly shown on the OS 1:25,000 maps) so you do not need to stick to rights of way. Take a print of this article with you and we will go for a short walk together. For some of the exercises it would also help if you go with a friend with similar map reading experience.
At the start of the walk orientate the map using the features on the ground. As a double check you can use the compass to see if you have set it correctly.
Next look around you and identify the main features of the landscape – forests, lakes, roads, mountains. Then keeping the map orientated, try to identify all those same features on the map.
Map memory exercise
Your friend now selects a route along linear features to an obvious point a few minutes walk away. They should not tell you where they are going. The aim is for you to follow them and remember all the detail of the journey: what do you pass on the left and right and what features do you cross? Think also about the terrain. Was it uphill, downhill or flat? When your friend stops at the destination your first job is to describe the journey to them in as much detail as possible without reference to the map. Having done so, get your map out and orientate it. Then from your start point on the map talk yourself along the route until you arrive at your destination. Take a few moments to check this by looking around you at the landscape and confirming what you can see on your orientated map. You can then confirm your location with your friend.
For many people the hardest part of this exercise is gauging the distance they have travelled. Repeat the exercise only this on this occasion, time how long you are walking for. Estimating your speed, convert the time into a distance travelled (use the timing chart). Having an estimation of the distance travelled to add to your mental description of your journey helps increase the accuracy of your positioning for your new location.
Improving your map memory is crucial to good navigation. Being able to remember the terrain you have walked over whilst discussing last nights TV is a skill that needs even more practicing!
Turning it around
Now the same exercise but the other way around. Starting from a known point pick an obvious point on the map a few minutes walk away. Measure the distance to it using the romer and estimating your speed, convert that to a time. Then looking at the map compile a list of everything you will pass including the terrain and slope information from the contours. The aim this time is to walk to your destination without looking at your map but ticking the features in your mental list off as you pass them. Remember to use your timing as a guide and then when you get to your destination, orientate your map and confirm your location.

Plan a few navigation legs that are a little longer. This time as you walk them, you will be allowed to use your map. As you start each leg:
- Orientate the map and confirm your current position
- Measure the distance and convert it to a time for that leg
- Look at the map and walk the route in your head, drawing up a list of things you will see
- Start walking and tick off the features you see
- Stop any time you want to re-orientate the map and confirm where you are
- Check the time and location when you get to your final destination to see how accurate your estimations were
Thumbing the map
Each time you pick up the map to work out where you are, it can take a while to find the right section of map to focus in on. One way around this is to thumb the map. As you walk keep the map in your hand and keep your thumb at your last known point. This will then give you a visual start point when you next look at the map.
If you have a laminated map or plastic map case another method is to use a permanent marker. Simply draw a rough box (a few km square) around the next section of your walk. If later in the day your walk extends out of that box, you can always add another one over the next section of the walk. The pen can be erased later using turpentine/spirits.
The 3D's
The 3D's is a little mantra for any navigational leg at any time. The 3D's are distance, direction and description. So for every leg consider:
Distance – Measure the distance using your romer and convert it to a time based on the speed you are walking
Direction – this may involve bearings(which we have not covered yet) or orientating the map to make sure you head off in the correct direction
Description – As well as the obvious features you pass start trying to concentrate on what the contours are doing. Does the leg start flat then go gently uphill before finishing steeply down? As navigation gets more complex there will be fewer walls, streams, buildings to work from but you will always have contours, so start using them now. Distance and direction each give you a single piece of information but the description can give you a long list of pieces of information so is particularly important.
Enjoy the rest of your walk
Plan a few more legs to take you back to your finish point and keep trying the various exercises above. With practice your map memory and ability to judge your speed will improve. With time you will also be able to identify smaller features on the ground by relating it to the orientated map.

About Ian Hey
Ian Hey holds the MIC and runs www.Climb-Mountains.com. He offers a full range of climbing and mountaineering courses and can arrange a suitable course to improve your navigation whether you have just bought your first compass or you are looking to navigate confidently in a Scottish white-out.
Before instructing he worked as a cartographer for Harvey Maps. His main role was to take the raw digitised data captured from aerial photos and turn it into an accurate yet aesthetically pleasing map. In between these 2 jobs he spent 3 years as the Technical & Safety Officer for the British Mountaineering Council.
He is currently making friends with penguins working as a field assistant for British Antarctic Survey. You can keep track of his adventures down south at http://climbmountains.wordpress.com.


Comments