

UKHillwalking and UKClimbing are featuring a series of articles on key hill skills in association with Mountain Training, the provider of nationally-recognised leadership qualifications and skills courses in walking, climbing and mountaineering. Mountain Training's awards and courses are run by approved providers, based all over the UK and Ireland. We've asked several of them to write us each a piece for the series.
In winter you're unlikely to get far on the hills in safety without spiky metal bits and a knowledge of how to use them. We covered walking with an axe in a recent skills article: here MIC Samantha Leary turns to crampons.
A quality winter day out in the British mountains can be hard to beat; but in order to safely enjoy the whole day, you will need crampons and an ice axe. First up, a comfortable pair of winter boots are a must. Compared to their summer relatives they will be warmer and have greater support and rigidity. They will enable you to kick steps in snow and provide a firm base for the crampons. And now for the crampons...
 © Samantha Leary
Before you go out
Once you have made sure your boot and crampon pairing are compatible (an article in its own right), double check the following points before heading out.
With gaiters on the boot, check the length of crampon (and gaiter) straps and if necessary trim them so you don't have to manage excess on the hill. Be careful about cutting them too short, a tail of about 10cm once through the locking system is good.

© Samantha Leary
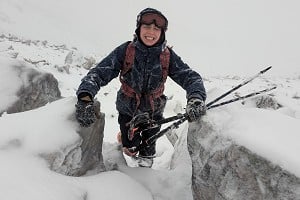
Practise putting your crampons on at home, while wearing gloves. There are days where you cannot take your gloves off! See photo 2.
Elastic drawloops on the back of gaiters are a common trip hazard, particularly when descending. Cut the loop and tie an overhand knot in the end of each tail, to stop the toggle falling off.
When packing your rucksack, keep the crampons accessible and always wrapped in something that will stop the spikes damaging your Platypus (messy) or your duvet jacket (expensive and messy!). A crampon bag is great idea.
Putting your crampons on
Strapping into crampons sooner rather than later is recommended. It will save you from teetering around on a steep slope while you try to put them on.
 © Samantha Leary
Choose a nice flat spot. I always coach clients to put their spikes on while facing uphill, either standing up or on one knee.
Avoid sitting on your rucksack; even on a fairly gentle slope you could end up being the next contender for the Olympic Bobsleigh team!
Orientate the crampons ready for your boots, i.e. front points up hill, and laid out left and right. Flick all the straps out of the way and ensure all buckles will be on the outside of the boot. Clear compacted snow and ice from the base of the boot and if using a 'step in' style crampon, from the grooves at the toe and heel. Place one foot in and after ensuring it's correctly seated between the posts, engage the fixing system. Keep all straps very neat without any twists so the boot has the cleanest profile possible; this will help avoid catching one foot on the other. Any excess strap needs to be tucked away on the outside of the ankle for the same reason. Once you are happy that the fit looks and feels secure, repeat with the other foot.
Walking in crampons
Now be careful! You have suddenly become a little taller and any one of the sharp points can do you a lot of damage. It’s a good idea to have a wee stomp around before setting off, to familiarise yourself with your new feet. Tripping over your own feet is an easy way to hurt yourself in the winter and it’s more likely to happen when you’re tired, so energy conservation is key.

© Samantha Leary
Walking on flat ground
Keep your knees flexed and feet shoulder width apart. Walk flat footed; lift each foot horizontally off the ground and then replace in the same manner. This will allow all the downward pointing spikes to engage and disengage at the same time. Always be aware of how far apart your feet are; in a contest between crampons and over-trousers, there will only ever be one winner! You should always be able to dribble an imaginary volleyball between your boots.
Walking uphill
Use your ice axe for support, only moving the tool when you have a firm balanced footing, and take care when changing direction.
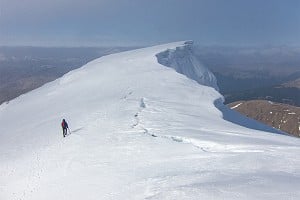
Concentrate on maintaining a flat foot technique until the slope gets too steep. This may require walking with your toes turned out (like a duck) or turning your body sideways, always pushing your ankles and knees downhill to allow all of the spikes to engage simultaneously.
When the slope steepens you may want to consider crossing over your feet. Be very conscious of the fact that your foot (with a big boot and crampon attached) is bigger than you think. Keep the crossovers small. If you try to take big steps, you will begin to lift the downhill spikes out of the snow.

© Dan Bailey
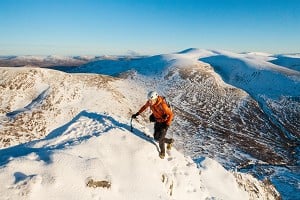
When the slope is too steep to walk flat footed, it's time to front point. Face directly into the hillside, keep your heel low, and kick the toe of your boot straight into the slope. Take small steps so that it should almost feel like a rocking motion from foot to foot as opposed to a one leg squat. This is tiring but it is a quick way of gaining height. However, bear in mind that you are only using perhaps four spikes per foot, compared with 10 points when flat footing. Long spells of front pointing on relatively easy-angled ground can be very hard work on the calves. You might like to consider a hybrid technique, front pointing with one foot and flat-footing with the other, turning this foot sideways and rolling the ankle downhill so that all the crampon points engage. Alternate which foot does what, to give your calves a break.
 © Samantha Leary
Walking on rocks and frozen ground
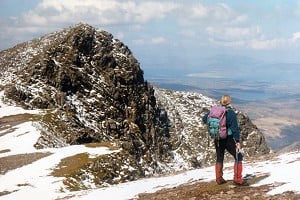
With crampons on rough ground it's all too easy to trip or turn an anle. Take your time and plan each step. Place your boot precisely; this will greatly add to your security and ankle comfort. Keep your weight directly over your feet. Anticipate the likelihood of the crampon rolling slightly, as it settles onto the less even terrain. Avoid kicking into rock, it just hurts, doesn't improve the grip and will considerably shorten the longevity of your crampon!
Walking downhill
Right then, you have reached the summit and are admiring the spectacular vista. Now all you have to do is get down; as ever in the mountains, this is the time when a lot of accidents happen. Descending in crampons can be easier than dealing with loose scree or steep wet grass but the consequences of a trip can be far more dramatic. Which technique you pick will be dictated by the angle, snow conditions and perhaps how threatened you feel by the exposure on the slope.
 © Samantha Leary
Facing into the slope and front pointing down is very secure and a great way to deal with the steep bit at the top. This is tiring and in descent it can be tricky to see where you are going, so take your time. With your feet apart, knees flexed and a horizontal foot, firmly kick into the slope as many times as needed to feel secure. Sometimes in hard névé, it may take two or three kicks before you feel happy.
As the angle starts to lessen, turning sideways and stomping down one foot above the other works well. Reinforce the placement if it does not feel good and remember to roll your ankles to allow the downhill set of points to engage. If things still feel insecure, stomp out a bigger step, which will allow your foot a flat platform.
Sometimes you may feel confident enough to face straight down the hill. If the snow is very hard, flat footing is again the key consideration here. To enable that to happen you need to 'sit in' to the step. There are many analogies that instructors use; walk like John Wayne, just out of the saddle. Sitting on a chair or toilet. Wearing a big full nappy! Essentially, keep your feet apart and place your foot down firmly, presenting it flat to the slope, not heel to toe as it can skid off.

© AlH, Feb 2012
In softer snow it is possible to heel plunge, but just be careful of catching crampon points on your other leg and the front points as you move your leg forward and down.
The mountains in winter offer people some of the most rewarding and memorable days of the year. Preparation, practise and prudence will ensure that we come back, time and time again. So get out there and enjoy (safely) what the mountains have to offer.
'Do nothing in haste; look well to each step; and from the beginning think what may be the end.' Edward Whymper 1865 (it is unknown if this eminent mountaineer ever snagged a pair of over-trousers!).

© AlexFrood, Feb 2014
For more key skills see the other articles in this series:

About Samantha Leary
Samantha Leary is a MIC with over 25 years instructional experience. She specialises in bespoke climbing and mountaineering coaching and guiding but is also heavily involved with training and assessing for SPA, SML and WML. Operating as a freelance instructor, she lives in North Wales in summer and Scotland in the winter.
Samantha can be contacted here.
About Mountain Training

Mountain Training’s aim is to promote awareness of mountain safety through leadership qualifications and skills courses in walking, climbing and mountaineering. There are 11 qualifications which prepare people to lead walking groups on different types of terrain, supervise and coach climbing or instruct others in summer or winter mountaineering. All of the qualifications are administered by Mountain Training and delivered by approved providers.
For more info on Mountain Training's courses see their website
You can find lots more information about all of these skills and techniques in Mountain Training’s Winter Skills book; the official handbook of the Winter Mountain Leader and Mountaineering Instructor Certificate schemes. It’s packed with information, photos and illustrations - an ideal reference tool for every mountaineer venturing onto non-glaciated snow and ice.


Comments