


© Fran Halsall
Considering angles and lighting
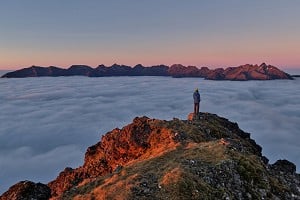
Whichever group you fall into, to maximise the likelihood of taking some half decent images it pays to prepare. When going over maps and route plans it can generally be assumed that most landscape features benefit from being sidelit or illuminated from a roughly ninety degree angle where one side is bright and the other is in shadow, which produces a full range of tones that makes the resulting image appear three-dimensional. The best time for sidelighting is at the beginning and end of the day when the sun is not so harsh, the light more colourful and shadows less stark.
When going over maps and route plans it can generally be assumed that most landscape features benefit from being sidelit or illuminated from a roughly ninety degree angle.
Backlighting is another possibility, however this is much more difficult to handle as silhouetted peaks, unless shapely and framed against an interesting sky, tend to produce rather flat images. Plus the contrast between dark objects and bright areas causes problems for a camera, which struggles to record all the tonal variation that our eyes see. The one thing to definitely avoid is having the sun behind the camera as sunlight falls evenly across the landscape and the shadows, so important for suggesting shape and depth, may be almost entirely absent.

© Fran Halsall
Kit List
There is a constant battle between vital camera equipment and all the other bits and bobs necessary to make hill-walking a comfortable experience. My typical kit includes one SLR camera body, a 17-40mm lens – ideal for wide shots with sweeping foregrounds, a 70-200mm lens – suited to zooming in on more distant features and isolating individual mountains, filters, lens hoods, batteries, head torch etc.
Many photographers would choose to take more lenses to cover different focal lengths but I usually find these two fairly flexible. Add to this the extra clothing needed for the long spells waiting around in windy conditions, midge nets and spray (as a static victim can quickly be eaten alive), enough food and there is barely room to squeeze in a slim flask of tea.
A compass is not only useful for knowing direction of travel it is also helpful for establishing the position of sunrise and sunset. Any observant walker will already know that the sun rises and sets in different positions throughout the year, towards the north in summer and the south in winter. This is particularly relevant to mountain photography where lower peaks and whole valleys could well be in shadow at the crucial times of day at a given time of year.
Along with a compass a pocket sunrise/sunset calculator is a worthwhile investment, as this will provide information that can then be double-checked with observations relating to surrounding peaks while on the ground. Life would be easy if all ridges ran north-south as, chances are, they would be sidelit in both the morning and the evening providing they are not too overshadowed.
This is why studying a map and reading contours is so important as it may become apparent that a particular feature, such as interesting crags that appear on one side of a hill, may bit lit only for part of the day. Consequently subjects that face south are best attempted in winter and those oriented north should be tackled in summer.
Planning the photo
Map reading and compass plotting are no substitute for prior experience of a landscape.
If one has the luxury of time, it is best to first test out the theory by walking without the pressure of trying to get great photographs. Concentrate on aspects such as how long it takes to walk from a to b, and whether indeed that tall summit's shadow will cause lighting issues.
It is a rare thing when I climb a peak for the first time and create an outstanding image.
Knowing a route and the distances between points of interest mean that the chances of success are greater when the light is right. There is nothing worse than uncertainty as to which way to dash when there is a brief window of ideal light and through indecision the opportunity is missed.
As a walker the ultimate goal is frequently the highest peak in a range, however as a photographer this is not always the case.
Many of my best shots are taken from halfway up (good news for those laden with heavy camera gear) or approaching the summit, as sometimes the distinctive character of a hill is lost from view in the final leg of the ascent. It is only when the summit geology is especially interesting or the views from the top unmissable that it is my priority.
A good strategy is to climb an adjacent peak of equivalent or slightly lower altitude (an upwards angle can have more impact) to gain views across.
Perhaps include a dramatic ridge, corrie or rock outcrop in order to lead the eye to the main feature.
 © Fran Halsall
Taking the shot
Handholding a shot requires a shutter speed of 1/60 second as the minimum threshold to avoid camera shake and in windy conditions this should be upped to 1/125.
The final consideration in terms of weight is a tripod. Many would understandably shun the extra baggage; however there are many reasons that prove their necessity. A camera mounted on a tripod means there are fewer issues with shutter speeds. Handholding a shot requires a shutter speed of 1/60 second as the minimum threshold to avoid camera shake and in windy conditions this should be upped to 1/125 second. This may be easy to achieve in bright conditions but in lower light levels it can be hard to achieve fast enough speeds without opening up the aperture and sacrificing depth of field (DOF) - or front to back sharpness throughout an image, which becomes a problem over large distances.
Ideally medium to small apertures in the range of f/11 to f/22 are used to gain the necessary DOF and although small apertures mean slow shutter speeds, this is no longer a problem if the camera is held completely still. Another possibility on digital cameras is increasing the ISO to make the camera more sensitive to light and gain faster shutter speeds but the higher the ISO the noisier and less detailed the result, so these values are best kept around 100 – 250.
Experience tells me good tripods are worth every penny. Lugging a tripod and head around that weighed in at 2.6 kg really slowed me down.
Composition is made easier when the camera is in a fixed position as a shot can be framed up and left, which allows a few minutes of thinking time and repeated checks through the viewfinder to ensure that everything is right. If not then it a simple task to make the incremental adjustments that make the difference between an OK and a great shot. It is also worth bearing in mind that unless lenses are specifically designed to be used hand-held, i.e. they have a stabilising motor built-in, they perform better optically when they are not moving about.
As tripods are so important it is vital to get the right one. The bad news is that if they are to be both lightweight and sturdy then prepare to spend quite a bit of money. Experience tells me that good tripods are worth every penny though. Lugging a tripod and head around that weighed in at about 2.6 kg really did slow me down. Now my tripod and head comes in at 1.2 kg and is much more suitable for someone my size and my back has thanked me ever since. Carbon-fibre technology is the way to go but even some of these are surprisingly heavy. Overall tripod height may have to be sacrificed in order to lose those extra kilos.

© Fran Halsall
Case study
Stac Pollaidh has a complex top and new features emerge each time I visit, such as these pinnacles on the southern edge. On the afternoon I spotted them they were lit from behind and in shadow, so for best results they would have to be tackled in the morning when, as it was November and the sun rises to the southeast, there was potential for this interesting angle to be sidelit.
The main issue was finding a tripod position on this precarious ledge that allowed enough space to exist between the pinnacle's top and Loch Lurgainn far below. That evening I practised setting up the shot so that I could be confident that it would actually work. Composed in anticipation of the sun emerging to the left, all the while with my camera strap wrapped firmly around my arm, as the drop directly below was unthinkable. The lens focal length was fairly wide at 21mm, allowing a direct proximity with the rocks but not so wide as to make the further peaks appear too distant.
Sunrise was around 7.45 and I set off just after 6.30am to allow well over an hour to ascend in the dark, for a walk that normally takes me 45 minutes or so. Aided by starlight I arrived with plenty of time to spare, which allowed me to familiarise myself with other nearby options in case the opportunity to take more shots presented itself.
Despite the clear start as the sun rose cloud built in the east and other clouds started to blow in from the west. It became quickly apparent that these carried snow but fortunately they stayed on the other side of the valley, cloaking Ben More Coigach with translucent veils. After about thirty minutes the sun finally climbed above the cloud layer and the effect was dramatic. If the wait had been much longer the sun would have moved too far round to the south and the lighting would no longer have worked for the shot I had visualised, as I would have been looking directly into the sun. In the low light and using a small aperture of f/18 the shutter was a slow 0.6 seconds long.

About Fran Halsall
Fran Halsall is a professional photographer and writer whose work is inspired by the wild landscapes, diverse geology and different habitats of the British Isles. She is the author of two books, The Peak District (Frances Lincoln, 2008) and Light and Shadow (Frances Lincoln, 2010), and is currently working on a third.
Fran is often found clambering about on hills and mountains, pursuing not only her obsessions with rocks and high places, but also chasing the 'perfect' light. She is passionate about promoting the value of our natural heritage through her work and hopes that we are all moving towards a better appreciation of our environment.


Comments